Science project
What Are the Layers of the Earth?
What’s inside the earth? Create a craft or bake a cake that will help you dig deep into the mysteries of the earth’s interior.
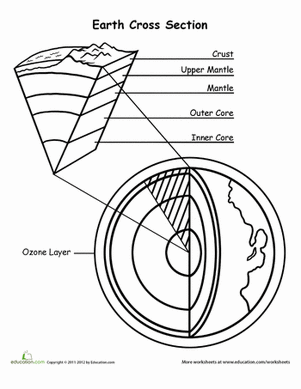
First, it’s time for a short geology lesson. The earth has four layers. The top layer is the one we live on, and it’s called the crust. The crust is like the crunchy outside of a loaf of bread, except that your bread probably doesn’t have trees living on it. The crust is made out of lighter rocks such as granite. All of the rocks, streams, mountains, and beaches where we see rocks are all part of the crust. The crust is fairly small when it’s compared to the other layers of the earth. It’s only 3 to 5 miles deep under the oceans and about 25 miles deep on land. The earth’s crust is not a smooth coating on the earth, but it’s made out of plates that move around. When the plates move against each other, it causes earthquakes.
The second layer of the earth is just below the crust. It’s called the mantle. The mantle is very thick: 1800 miles deep. The mantle is a little bit like a sandwich. On the top and bottom parts of the mantle, the rock doesn’t move very much. In the middle of the mantle is the asthenosphere. This part of the mantle moves around fairly slowly. This moving mantle layer pushes the earth’s plates around.
Next is the core of the earth. The outer core is very hot. It can be up to 9000 degrees F! Inside the outer core, metals such as iron and nickel move around as liquids.
The inner core of the earth is the center of the earth. All of the rocks on the outside press down on the inside. The rocks in the core vibrate and are squeezed together by the other layers. This layer is not as thick as the other inner layers of the earth. It’s 800 miles thick.
Problem:
Create a model of the Earth’s layers.
Materials
- Compass White paper
- Stapler
- Yellow, orange, red, blue, and green modeling clay
- Yellow, orange, red, blue, and green pieces of construction paper
- Cake mixes (1 white, 1 yellow, 1 red velvet)
- Cake pans
- Blue and green food dye
- White icing
- 2 bowls
- Spoon
- Oven
Procedure
- To help you understand all of the layers, draw a picture of the size of the different layers. Using a compass to help you draw different sizes of circles, draw a very thin crust, the upper mantle, the lower mantle, a thick outer core, and a smaller inner core.
- Crust: Up to 25 miles
- Upper mantle: 225 miles
- Lower mantle: 1280 miles
- Transition between lower mantle and outer core: 700 miles
- Outer core: 1400 miles
- Inner core: 800 miles
- To figure out the relative sizes of each layer, you’ll need to do some math. Let’s take the crust as one unit of measurement and compare everything else to that. The crust is 25 miles deep. The upper mantle is 225 divided by 25, which is 9. This means that the upper mantle will be nine times thicker than the crust. Do this for each item in the list above, and you will get an understanding of how thick or thin each layer needs to be. If each 25-mile section is 1 inch thick, how many inches will the thickest layer be? How small does the thickest layer need to be so that your drawing doesn’t extend off the paper? Remember that this is never exact. In some places, the crust is thin, while in other places it is thicker. It is thicker under the continents and thinner under the ocean.
- Now let’s dive into the fun part: building a model of the earth’s layers! You can use a number of different materials to build a model of the earth. One of the easiest is modeling clay. Use different colors of modeling clay to create a half-sphere of the earth. This will allow you to see inside and look at the layers. Using the dimensions you’ve calculated above, start by making the small inner core. Add layers in the correct thickness, starting from the inside and working toward the outside. Build this layered ball of clay and cut it in half to see a cross-section of the layers at the end. You can treat the mantle as a single section, or add more layers of clay to show the different sections of the mantle.
- Create an earth book! Make a circle that represents the core of the earth. For each layer, add on the depth of that layer to the circle that you’ve already made, then cut out that new, larger circle. For example, the inner core is 800 miles and the outer core in 1400 miles, so the two together make a 2200-mile circle. When you’ve cut out circles for each of the layers of the earth, place the largest one at the bottom and stack up all of the layers, placing the inner core in the middle. Use a stapler to stick them together, and write information about each layer on the inside of that layer. Get creative! Can you design a pop-out core?

- How about baking an earth cake? Create several cakes, each with a different food coloring. Stack them in layers after you’ve baked them, putting icing between the layers to help them stick together and on the top to represent the crust. When you put the cake mixes into the pans to bake, try to use the approximate dimensions that you calculated above so that the cake layers will be the correct thickness.

Why?
The earth formed from a big cloud of dust and gases. Gradually, the dust and gas came together, forming the earth. In those early days over 4 billion years ago, the earth was mostly made up of liquid rock in volcanoes and was pounded by collisions from other things in space. Over time, the earth began to cool, and more solid layers formed, creating the earth’s crust.
Sometimes people talk about the earth’s “spheres”. The spheres of the earth are a way to describe some of the different, large-scale types of matter on the earth. There's the atmosphere, which contains layers just like the earth does. The earth’s hydrosphere contains the water on the earth. The lithosphere is part of what you’ve been exploring today: it contains the layers of rock closest to the surface of the earth, such as the earth’s crust. The asthenosphere is in the upper mantle. Inside each sphere, matter changes from gas to liquid to solid form.
Digging Deeper
How could you adjust your models to show the changes in matter and the different states in each sphere?
Education.com provides the Science Fair Project Ideas for informational purposes only. Education.com does not make any guarantee or representation regarding the Science Fair Project Ideas and is not responsible or liable for any loss or damage, directly or indirectly, caused by your use of such information. By accessing the Science Fair Project Ideas, you waive and renounce any claims against Education.com that arise thereof. In addition, your access to Education.com's website and Science Fair Project Ideas is covered by Education.com's Privacy Policy and site Terms of Use, which include limitations on Education.com's liability.
Warning is hereby given that not all Project Ideas are appropriate for all individuals or in all circumstances. Implementation of any Science Project Idea should be undertaken only in appropriate settings and with appropriate parental or other supervision. Reading and following the safety precautions of all materials used in a project is the sole responsibility of each individual. For further information, consult your state's handbook of Science Safety.


